Guide to see and photograph the Northern Lights in Iceland
Iceland is a photographer’s paradise, where you can admire unique landscapes, towering cliffs, impressive waterfalls, and natural curiosities such as geysers and natural hot springs.
But Iceland is also the best place to see the Northern Lights.
It’s not easy to know when and where to see them, and even less easy to take pictures of northern lights. So we decided to do a post on the subject to give you our tips for seeing northern lights in Iceland!
- 1 What is the aurora borealis?
- 2 Best time to watch the northern lights in iceland
- 3 What you need to photograph the northern lights
- 4 The best place for seeing the Northern Lights in Iceland
- 5 Our 10 tips for photographing the Northern Lights in Iceland
- 5.1 1. Consult aurora borealis and weather forecasts
- 5.2 2. Use a camera with a good sensor
- 5.3 3. Use a bright lens
- 5.4 4. Stabilize with a stable tripod
- 5.5 5. Using the right camera settings
- 5.6 6. Using manual focus
- 5.7 7. Set white balance
- 5.8 8. Using landscape for creative compositions
- 5.9 9. Prospecting to find the right spot for the Northern Lights
- 5.10 10. Use post-processing to reduce noise
What is the aurora borealis?
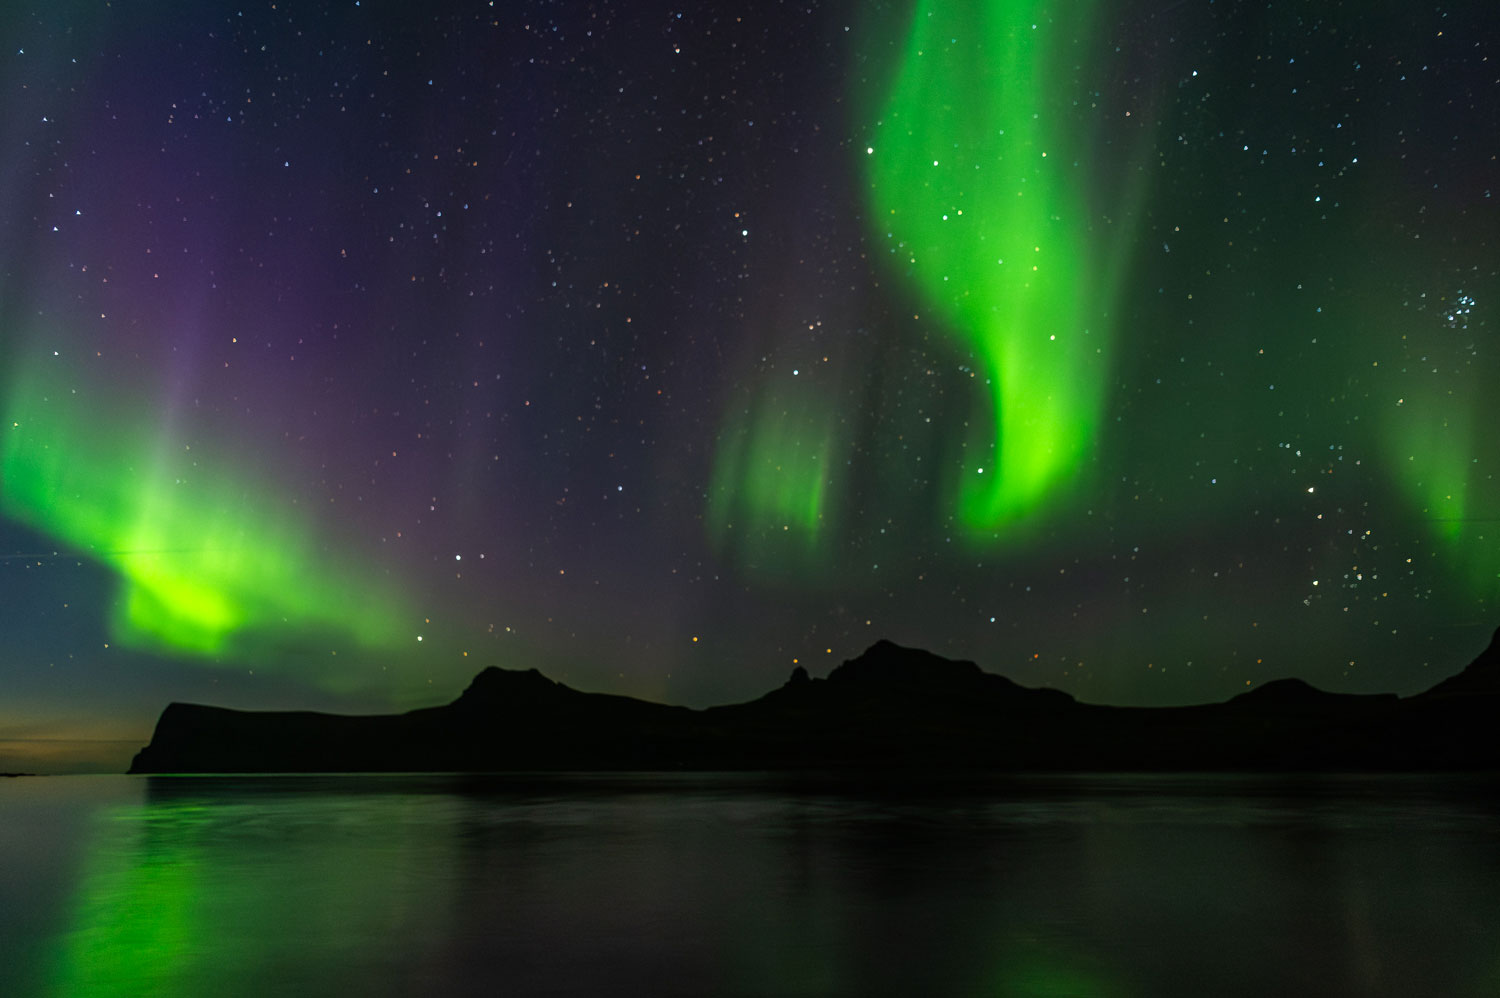
Before considering how to see the Northern Lights in Iceland, it’s important to understand what an aurora borealis is. The phenomenon is fascinating and striking, and the scientific explanation is simple: particles are ejected from the sun during solar flares. These particles (mainly ions), carried by solar winds, reach the Earth’s upper atmosphere and are attracted by the magnetic poles. On contact with the atmosphere, chemical reactions create colors ranging from green to red to purple. This is why the aurora borealis is only visible near the poles.
Variations in aurora color depend on altitude. At an altitude of 100 km, the color is purple, while it is green between 120 km and 180 km.
While we now have scientific explanations for the aurora borealis, this has not always been the case. In the past, myths and legends existed to explain this phenomenon that has both frightened and fascinated mankind. The Sami of Finland, for example, believed that the northern lights were caused by an Arctic fox which, as it roamed the tundra, lifted snow crystals to create the aurora borealis in the sky.
Some Inuit tribes believed that the Northern Lights were caused by walruses playing ball with human skulls.

Best time to watch the northern lights in iceland
If you’re visiting Iceland to see and photograph the Northern Lights, you’ll need to choose the time of year carefully. In fact, there are a number of Arctic-specific factors to bear in mind.
First and foremost, you need to know that activity on the sun’s surface is permanent. This means that the aurora borealis exists all year round. However, since daylight is permanent around the Arctic Circle (66° north) between May and August (the polar day), it’s impossible to see the Northern Lights in Iceland in summer.
From April onwards, the nights are lighter and less dark. We’re gradually slipping into polar daylight. By mid-May, it’s daylight 24 hours a day. Darkness gradually returns in August, before total darkness in early September. This is the start of winter in Iceland.
In conclusion, it’s impossible to see the Northern Lights in Iceland in May, June, July, and August. The best time to see and photograph the Northern Lights in Iceland is between September and March. Our favorite period is February and March. It’s not only possible to see the northern lights, but also to take advantage of the long daylight hours to visit Iceland and its wonders.
So, to see the Northern Lights and take photos, visiting Iceland in winter is the only option.

What you need to photograph the northern lights
The first thing you need to know is that your clothes will matter the most in Iceland. Before considering anything, make sure you have the right clothes and equipment. After all, chasing the northern lights in Iceland means staying outdoors in the cold, sometimes for several hours at a time.
As far as equipment is concerned, it’s no different from that needed for landscape photography, with a few exceptions: In addition to an ISO-capable camera, a wide-angle lens with a large aperture (between f/1.8 and f/2.8), and a tripod heavy enough to withstand the Icelandic wind, you’ll need :
- An absorbent cloth and a chamois to prevent the lens from freezing or fogging up.
- A headlamp to focus and see in the dark.
- A remote control to trigger the camera without using the release button and causing vibrations (you can also use the camera’s self-timer for this).
- As many camera batteries as possible, as the cold quickly discharges them. I recommend keeping them warm, in your pocket for example, to prevent them from discharging before they’ve even been used.
- A spare memory card, because, you never know, the Northern Lights could dance across the Icelandic sky all night long!
The best place for seeing the Northern Lights in Iceland
The Northern Lights can be seen and photographed in all regions of Iceland. But there are some special features to be aware of:
- Photographing aurora borealis in southern Iceland: cloud cover is rather heavy in southern Iceland, especially when the wind blows from the west or south. The chances of seeing the Northern Lights in South Iceland are therefore lower. On the other hand, natural sites such as the Golden Circle, waterfalls, and the Vatnajökull glacier are well worth the wait.
- Photographing the Northern Lights in North Iceland: unlike in the south, the skies around Akureyri’s town in northern Iceland are often clear. The surrounding mountains create a bulwark against the clouds and protect the inland valleys. It’s also a great area for landscape photography in Iceland. Goðafoss waterfall, for example, is an excellent spot for aurora photography.
- Photographing the Northern Lights in the Westfjords and Snæfellsnes: as in the south, the Westfjords and Snæfellsnes Peninsula are often overcast. On the other hand, population density in the Westfjords is very low, which means very little light pollution. The northern lights are more visible, with higher contrast. You just have to get away from the big villages like Isafjordur or Patreksfjordur to take advantage of this.
- Photographing the Northern Lights in the East Fjords: Avoid this region when the wind is blowing from the northeast or east. On the other hand, it’s the place to go when westerly winds bring clouds over the south and west of the country. The East fjords abound in beautiful scenery, perfect for auroras.
In conclusion, aurora can be seen and photographed anywhere, but the best place to see the Northern lights in Iceland is the north.

Our 10 tips for photographing the Northern Lights in Iceland

1. Consult aurora borealis and weather forecasts
The first step to photographing the Northern Lights in Iceland is to check the forecasts. The Icelandic website Vedur.is provides both cloud cover in Iceland and forecasts of solar activity, and therefore of the Northern Lights. The aurora forecast is given in Kp. A scale from 0 to 9 indicates the intensity of the aurora borealis. Between 0 and 3, the intensity is considered low. From 4 and 5, things get more interesting!
Apps such as Aurora Forecast allow you to follow the Northern Lights forecast in real-time on your smartphone.
2. Use a camera with a good sensor
To photograph the northern lights, you need a camera sensor that’s up to the job. Indeed, given that you need to raise the ISO considerably to get enough light into the camera, only cameras with a good sensor will do. Otherwise, you’ll end up with very noisy, unusable images.
A recent SLR or full-frame mirrorless is ideal.
3. Use a bright lens
Needless to say, the main challenge when photographing at night is getting enough light to expose your picture. To help you overcome this constraint, the ideal is to opt for a bright, wide-angle lens with a large aperture. An f/2.8 aperture is perfect.
Similarly, to get the widest possible frame and cover a large part of the sky (and the northern lights), you’ll need a lens between 14mm and 24mm. Beyond that, you risk being too restricted in your compositions.
4. Stabilize with a stable tripod
How can you photograph the aurora borealis without a long exposure? Well, you’ll need to stabilize your camera with a tripod. All you need is a simple tripod, given the light weight of a wide-angle lens. On the other hand, you’re likely to run into another problem, that of movements created at the moment of shutter release. To overcome this problem, there are two solutions:
- Use a remote control so you don’t have to touch the camera when you release the shutter.
- Set the camera to self-timer (2 seconds is enough), so that the vibrations caused when you press the release button have stopped by the time the exposure begins (after 2 seconds).
In any case, stabilizing your camera is essential for capturing the Northern Lights and avoiding motion blur.
5. Using the right camera settings
Camera settings for the Northern Lights depend on the equipment. But overall, we can give you the following advice:
- Always use manual mode to adjust all parameters.
- Exposure should be between 2 seconds and 10 seconds; beyond that, the Northern Lights become too blurred.
- The aperture should be as wide as possible, ideally f/2.8.
- ISO Sensitivity should be high, between ISO 1000 and ISO 6400, depending on the quality of the camera and its ability to increase ISO.
For older cameras, it’s better to increase exposure time than to increase ISO. For example, an exposure/sensitivity pairing of 10s / ISO 800 is preferable to a pairing of 2s / ISO 6400. For more recent cameras, the opposite is true, as they are capable of increasing ISO without degrading the image.
6. Using manual focus
Focusing at night is not always easy in photography. The first thing to do is to use manual focus. Then, depending on these two cases, the settings differ:
- If there’s no foreground: in this case, things are simple: just set the focus to infinity.
- If there is a foreground: this is different, as you need to focus on the foreground. In this case, simply light the foreground with a headlamp or your smartphone, focus, and then switch off the light.
However, it’s important to avoid focusing on a subject that’s too close. If you do, there’s a risk of obtaining a blurred background (and therefore a blurred Northern Lights).
7. Set white balance
Although white balance adjustments can be made in post-processing, it is recommended to do them before shooting. This allows you to have realistic previews on the screen and adapt to other settings.
Above all, avoid setting the white balance in automatic mode. Color temperature for Northern Lights should be between 3200K and 4000K.
8. Using landscape for creative compositions
It’s always important to make the most of the landscape when shooting at night. And Iceland is the best place to do it! The ideal way to photograph the Northern Lights in Iceland is to find a prime foreground, such as a waterfall, a block of ice, a lake, or an animal like the Icelandic horse. Once you’ve found that foreground, you need to manage the background. A fjord or mountains can add depth to the image. Finally, the Northern Lights will do the rest!
Using water (a waterfall, lake, etc.) as a foreground helps you compose with the reflections of the Northern Lights.
Finally, don’t hesitate to take a stroll to experiment with different perspectives and find the right angle for the perfect aurora borealis photo! Iceland has everything you need to create original and creative compositions.

9. Prospecting to find the right spot for the Northern Lights
In photography in general, you should always take the time to prospect. This step is essential. To photograph the Northern Lights, you first need to find a location with low light pollution. Next, you need to prospect for a subject and a background. Finally, you need to find a northern orientation. For example, a south-facing fjord won’t do, while a north-facing peninsula would be perfect.
10. Use post-processing to reduce noise
Once you’re back home, it’s time to process your photos. The main post-processing to be done on Northern Lights photos concerns noise reduction. The latest versions of Lightroom offer noise reduction with the help of AI. But you can also do it manually, by smoothing solid surfaces and keeping noise only on contours. These settings are available in the “Detail” section of Lightroom.
